向日葵 C1Pro 接入 HASS 实现多模 1 离线自动重启
前言
- 去年年底在学校 20 块钱买了一个,接入 HASS 然后再接入 HomeKit 实现 iPhone 充电到 80% 自动断电的自动化用着还不错
- 双十二又买了俩准备带回家用,20 块钱在那个时候应该是能接入HASS的智能插座中最低梯队的价格了
- 寒假回家就懵逼了,这玩意压根连不上我家的小米 AX6000,明明在学校连我的华硕 AC68U 一点问题没有
- 去检索了下才发现这玩意网上大量差评说连不上 Wi-Fi 的,必须得把路由器的无线模式为设为 11g only。我总不能为了俩破插座买个能单独设置无线模式为 11g only 的路由器吧,遂放弃,丢抽屉里了
- 期间我还尝试了下把 AX6000 的 Wi-Fi 5 兼容模式打开,并关闭了 MU-MIMO、AIoT 智能天线自动扫描、畅快连等功能,然并卵
契机
- 这破小米智能多模网关又双叒叕离线了,吐啦,哥们摸着也不是很烫啊,温热的,咋就离线了

- 手里的智能插座全拿去做自动化了,就剩这哥仨了。想想再试试吧,结果莫名其妙连上去了…
- 挺离谱的,就跟我这 AX6000 一样,以前一直断流,搞得我很烦,一度想贱卖了去买 XDR5480。结果过了一段时间莫名其妙就不断了,我看了下固件也没更新啊…
正篇
也不知道它咋连上去的,既然连上了那就操练起来吧
抓包
- 前人已经造过轮子了,这里直接搬一下
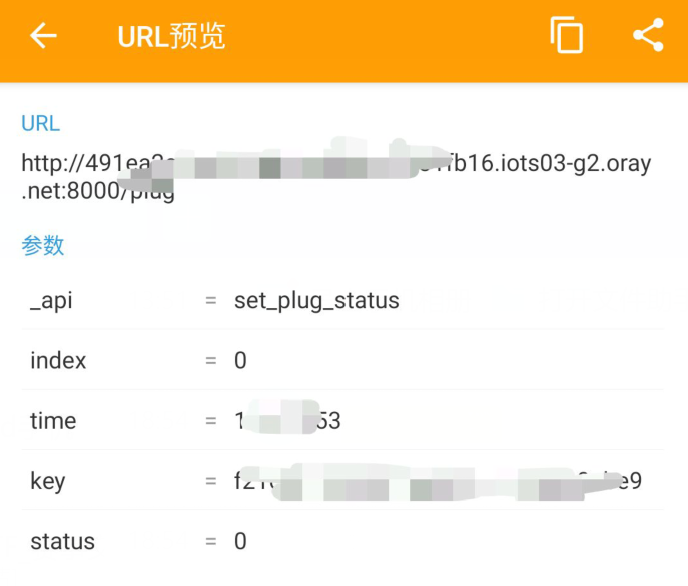
- 抓包向日葵 APP 可看到在开关插座时,APP 会请求 x.iots03-g2.oray.net:8000/plug 地址,参数可见:
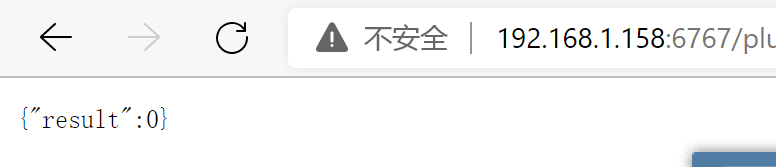
- 使用浏览器打开此地址,发现可以正常操作插座。
- 重置设备后 key 值仍不变,所以请勿将此地址发给别人。
- 获取插座状态
1
2
3
4
5
6
7
8
res = await axios.get(oray_url, {
params: {
_api: "get_plug_status",
index: 0,
time: xxxxxxxx,
key: "your_key"
}
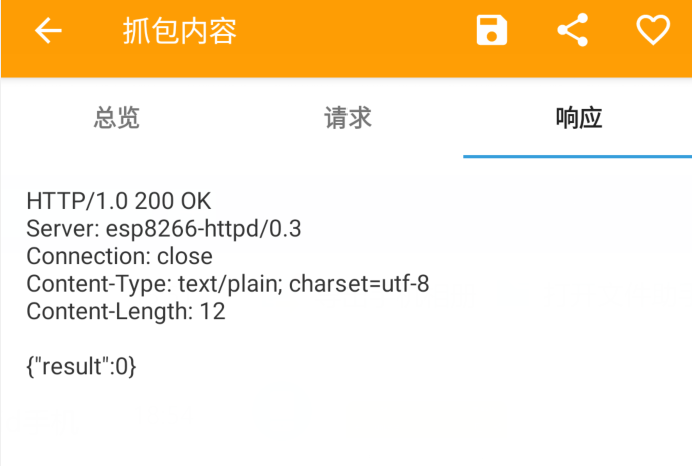
}); - 返回信息:其中 status 0 为关,1 为开;index为多口插排需要的参数,我这个是单口的,不管它。
1
{"response":[{"index":0,"status":1}],"led":1,"def_st":2,"result":0}
- 设置插座状态
1
2
3
4
5
6
7
8
9
res = await axios.get(oray_url, {
params: {
_api: "set_plug_status",
index: 0,
time: xxxxxxxx,
key: "your_key",
status: 0 or 1
}
}); - 返回信息
1
{"result":0}
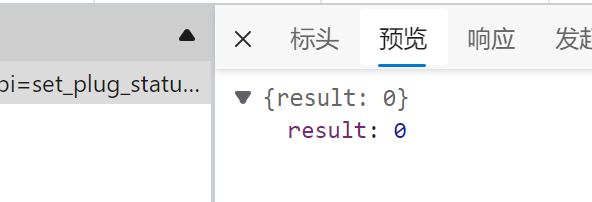
- 进入路由器后台可看到插座 ip 地址,试着扫描端口,发现 5767 端口开着


- 使用 ip:port 代替向日葵外网域名调用 API 发现可以正常使用。
- 至此已经可以在内网环境正常使用 API 开关插座了,下面来试试接入到 homekit。
- 抓包向日葵 APP 可看到在开关插座时,APP 会请求 x.iots03-g2.oray.net:8000/plug 地址,参数可见:
- 浅抓个包获取
time和key的值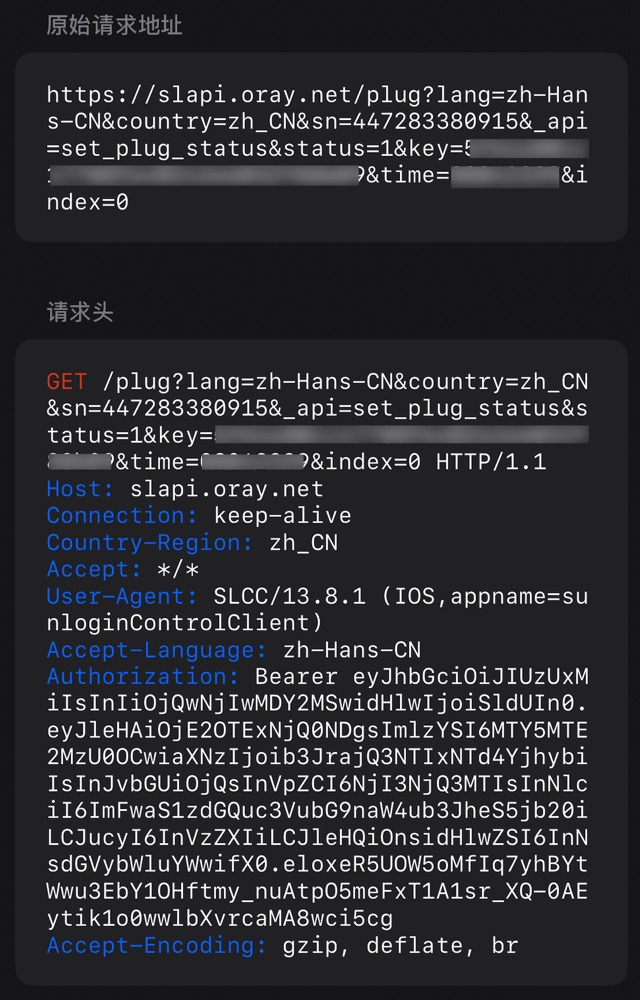
接入 HASS
- 在 HASS 的配置文件
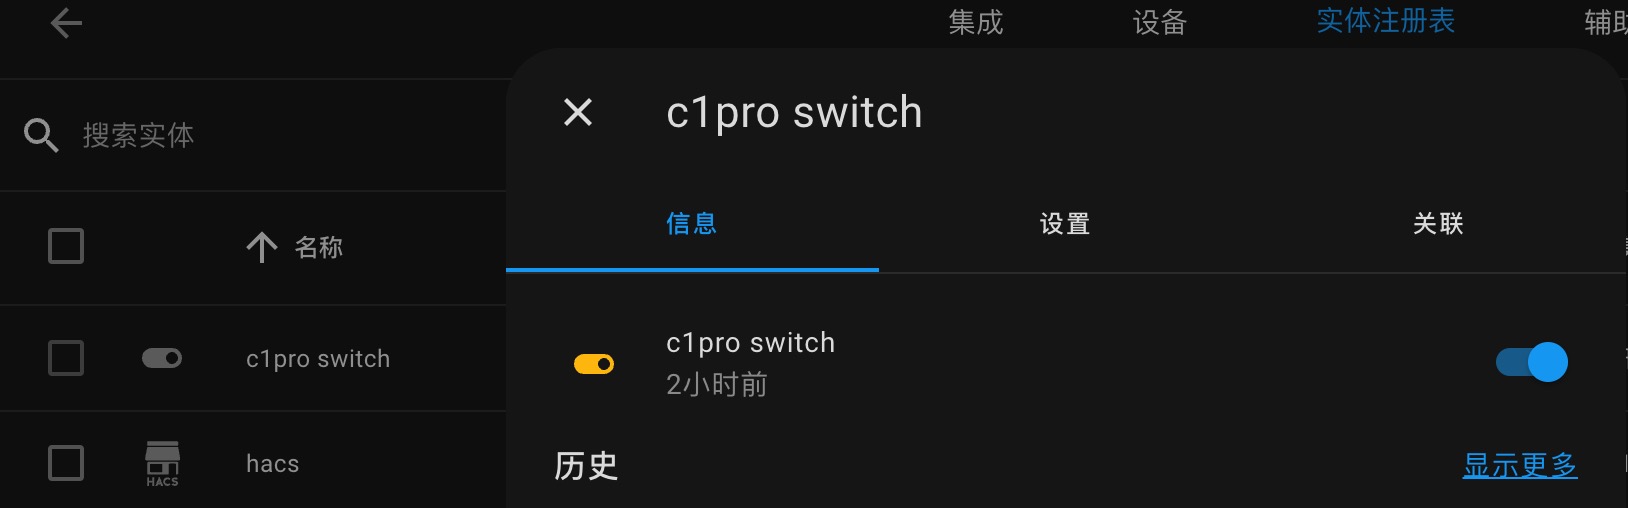
configuration.yaml中加入下面这段即可添加实体1
2
3
4
5
6
7
8
9
10
11
12
13
14
15
16
17switch:
- platform: command_line
switches:
[你想给插座取的名字]:
friendly_name: c1pro switch
command_on: >
curl -X GET "http://[插座的ip]:6767/plug?_api=set_plug_status&index=0&time=[插座的time值]&key=[插座的key值]&status=1"
command_off: >
curl -X GET "http://[插座的ip]:6767/plug?_api=set_plug_status&index=0&time=[插座的time值]&key=[插座的key值]&status=0"
command_state: >
curl -X GET "http://[插座的ip]:6767/plug?_api=get_plug_status&index=0&time=[插座的time值]&key=[插座的key值]&status"
value_template: >
{{value_json.response[0].status == 1 }}
icon_template: >
{% if value_json.response[0].status == 1 %} mdi:toggle-switch
{% else %} mdi:toggle-switch-off
{% endif %} - 重启 HASS 后即可看到实体
设置自动化
- 在HASS的配置文件
configuration.yaml中加入下面这段,即可通过 ping 判断多模 1 是否在线1
2
3
4
5
6device_tracker:
- platform: ping
hosts:
gateway1: 172.20.0.5 # 多模1的ip
interval_seconds: 10 # 每隔10秒检测一次
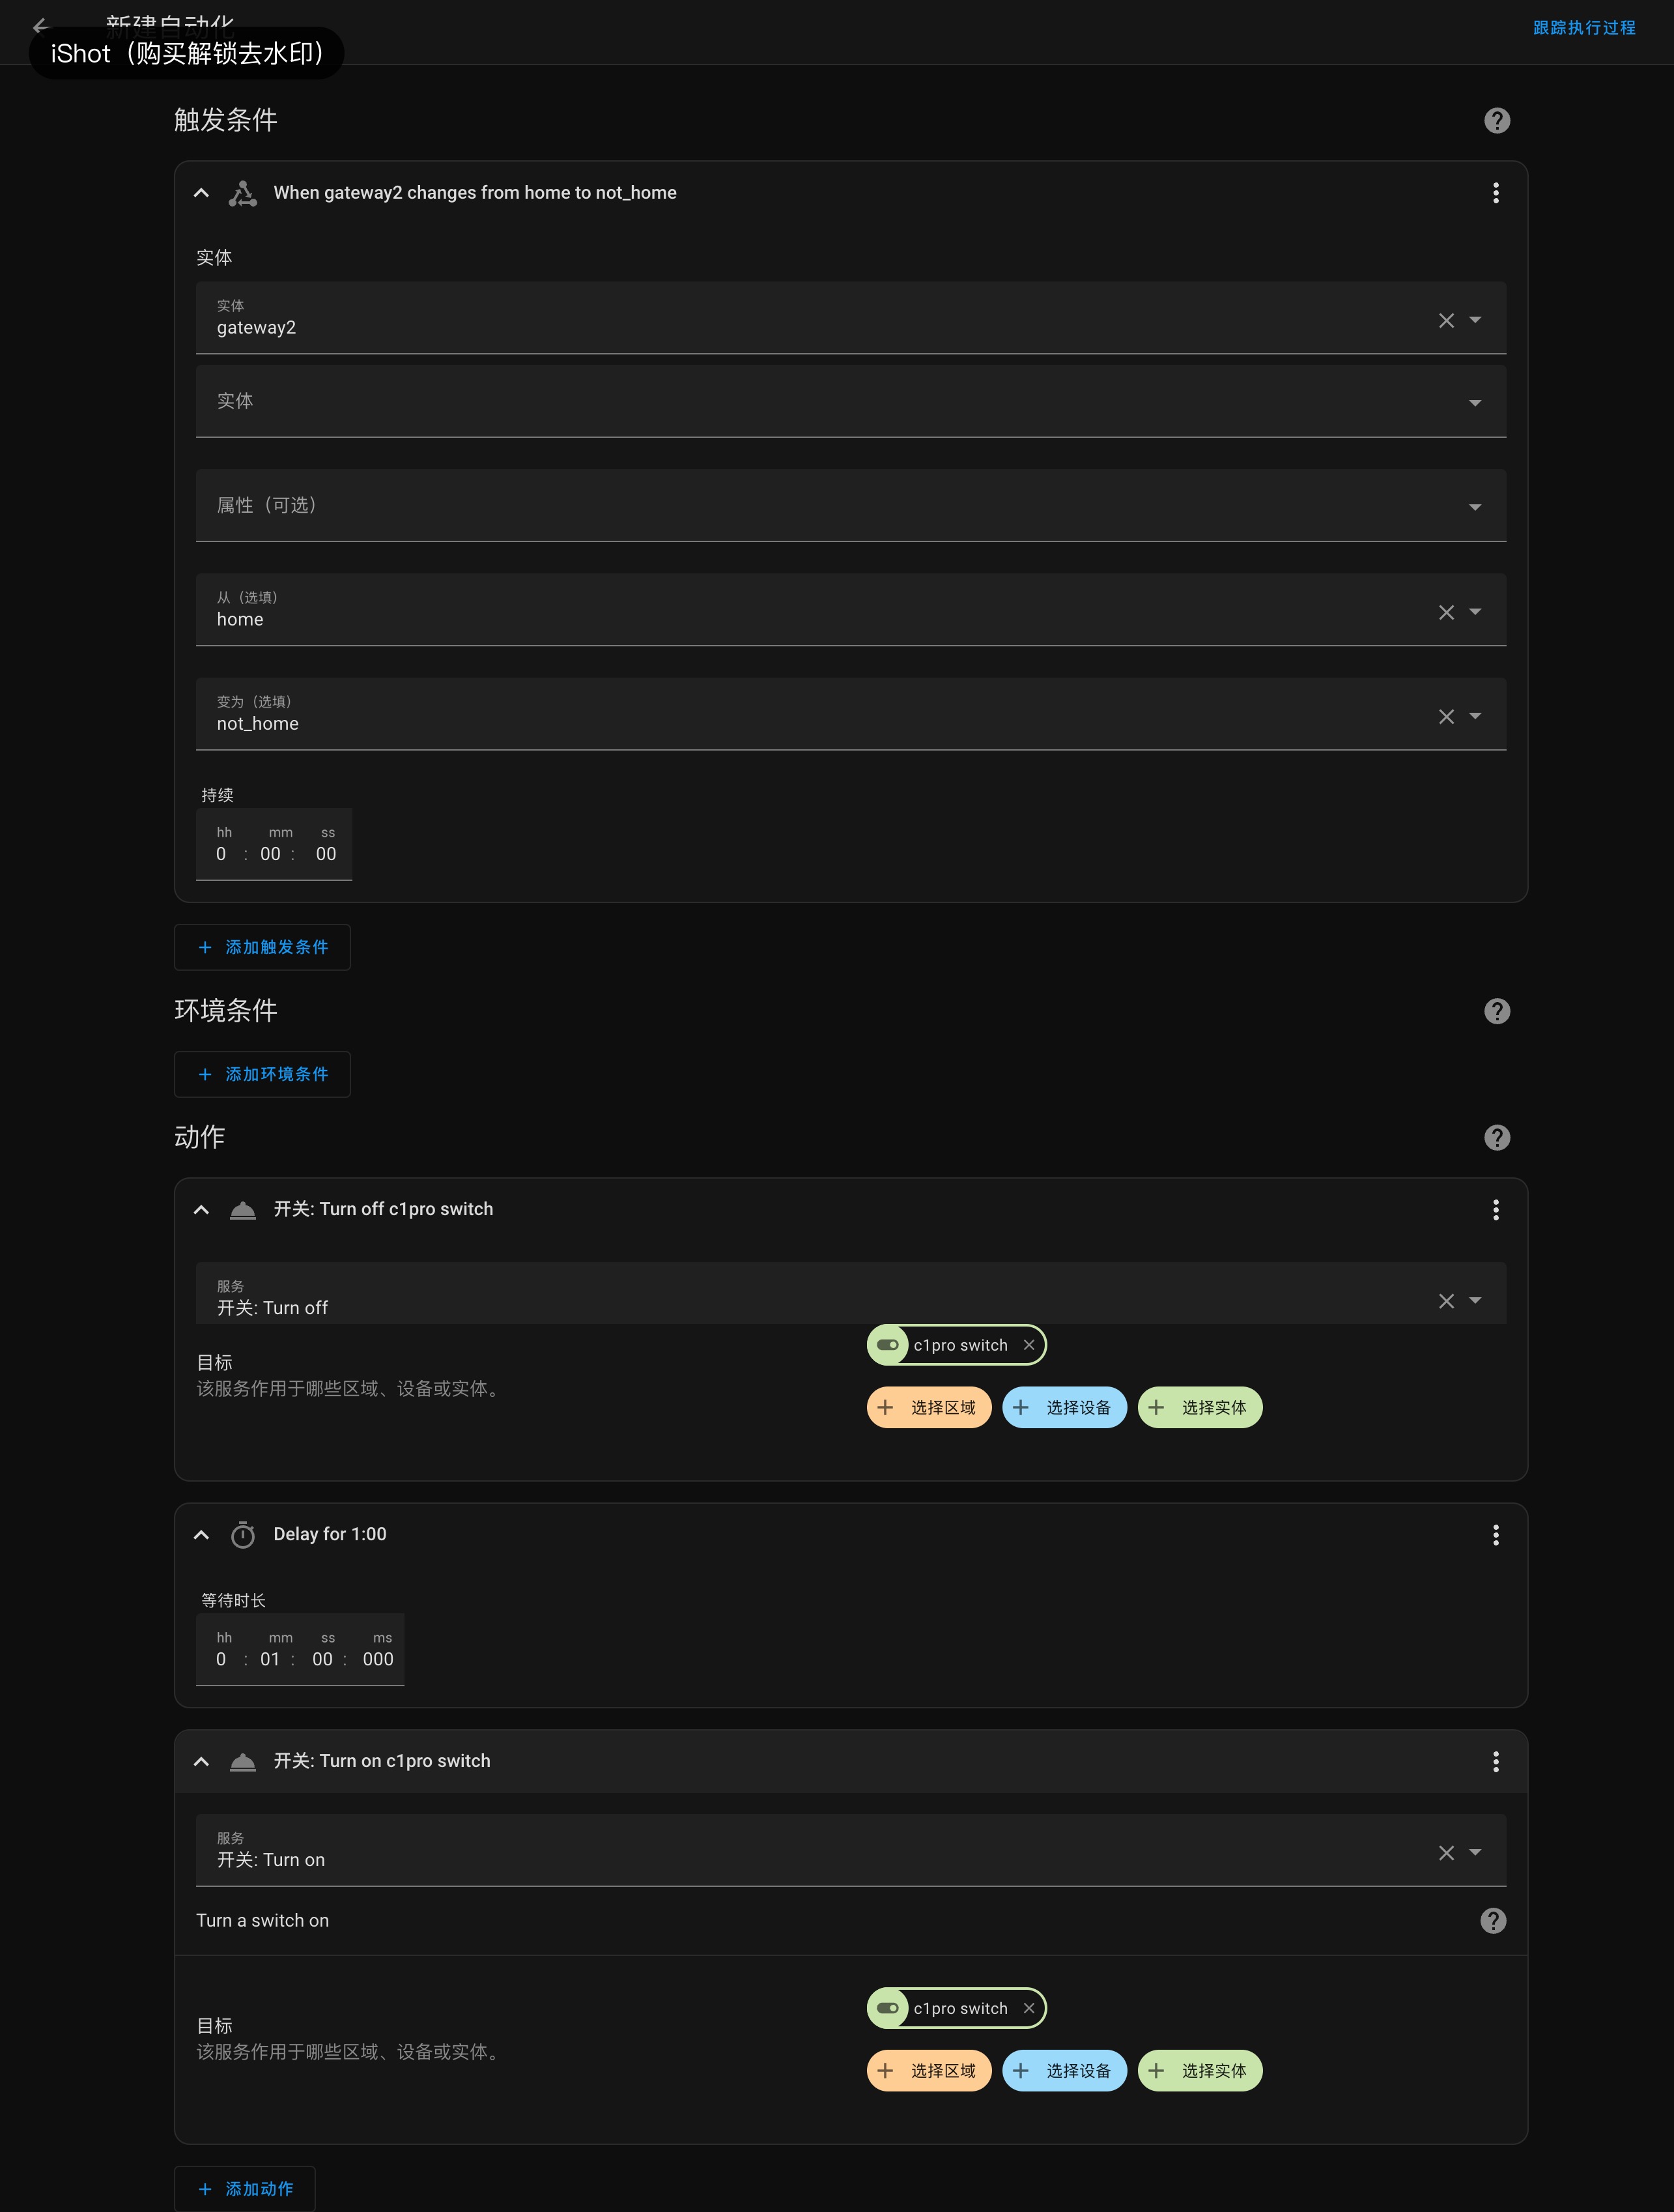
consider_home: 20 # 如果连续20秒内一直ping不通,那么这个设备就是离线状态 - 新建名为“多模 1 离线自动重启”的自动化
1
2
3
4
5
6
7
8
9
10
11
12
13
14
15
16
17
18
19
20
21
22
23description: ""
trigger:
- platform: state
entity_id:
- device_tracker.gateway1
from: home
to: not_home
condition: []
action:
- service: switch.turn_off
data: {}
target:
entity_id: switch.c1pro_switch
- delay:
hours: 0
minutes: 1
seconds: 0
milliseconds: 0
- service: switch.turn_on
data: {}
target:
entity_id: switch.c1pro_switch
mode: single
本博客所有文章除特别声明外,均采用 CC BY-NC-SA 4.0 许可协议。转载请注明来源 七夜 の Blog!
相关推荐

2024-04-06
出租屋部署 HASS 实现全屋智能
前言最近从杭州搬去南京了,出租屋的智能家居要重弄一下,刚好补一下拖了半年的智能家居文章 设备 设备 型号 主机 斐讯 N1 网关 小米多模网关 红外 / 射频遥控器 博联 RM plus 斐讯 N1:刷了 Armbian,具体怎么刷 Baidu / Google 吧,我这边之前刷过了懒得重刷一遍演示了 小米多模网关:系统已经刷成了 MOD 版的最新版,具体怎么刷后面简单带一下 博联 RM plus:红外 + 射频遥控器,59 块钱海鲜市场收的全新 处理小米多模网关系统已经刷成了 MOD 版的最新版,具体怎么刷我简单带一下 打开 telnet 系统版本:官版最新版 应该只能拆机开 telnet 了,具体参考这个:https://github.com/AlexxIT/XiaomiGateway3/wiki 系统版本:官版<= 1.5.5 看这个:https://github.com/AlexxIT/Blog/issues/13 文内说的通过按按钮打开 telnet 的方法不完整,应是: 给网关断电,等 10s 后...
2024-08-13
利用 Node-RED 连通小爱与 HASS
前言 之前写过一期利用巴法云作为中转,让小爱控制 HASS 中的实体 但是最近不知道为什么总是执行出问题,刚好在玩 Node-RED,直接用 Node-RED 解决这个问题吧 环境 Home Assistant Node-RED node-red-contrib-home-assistant-websocket 实操 小爱必然是过云的,所以不用纠结本不本地的问题,先用 Xiaomi Miot Auto 通过「账号集成」的方式把小爱音箱接入 用 events: state 节点获取我们给音箱发的语音指令,实体得选择 sensor.xiaomi_..._conversation,记得取消勾选 当前状态等于先前状态 后面跟个 switch 节点,判断关键词 最后用 call service 节点执行相应的操作 示例123456789101112131415161718192021222324252627282930313233343536373839404142434445464748495051525354555657585960616263646566676869707172...
2024-06-25
倒反天罡,将 HASS 中的实体接入米家
前言 最近遇到一个问题,由于我们公司的空调的智能属于美的美居,通过 Midea AC LAN 本地接入 Home Assistant 中没什么困难 但是米家是接不了这玩意的,且我们的空调插头那有漏保,接不了空调伴侣,故只能用小爱音箱 Pro 进行红外遥控 而这就导致了如果有障碍物,会导致空调没有收到红外指令,前两天下班的场景执行后我们就离开了,第二天被老板告知空调没关,《惨》 思路 由于米家不能虚拟开关,所以要么整个米家的寄存器接入 Home Assistant,通过这个寄存器充当桥梁,来实现相关的自动化。比如在米家内,场景 下班 执行后会打开这个寄存器,Home Assistant 检查到寄存器打开,就执行所有灯和空调关闭 要么咱想点办法曲线结果,把 Home Assistant 中的空调反方向接入米家当中 解决真是有人瞌睡就有人递枕头,随便检索了下就看到了这个 bemfa 项目,可以实现将 Home Assistant 实体同步至巴法云,并使用小爱同学/天猫精灵/小度音箱控制,直接开始操练吧 操练项目作者已经写的很清楚了,我不再赘述,下面提几个注...
评论