主机 + 服务状态监控 —— 哪吒监控
一切看 wiki !
评价
优势
- 哪吒 = ServerStatus + Uptime Kuma
- 有 GUI,比 ServerStatus 方便一点
劣势
- 对比 ServerStatus 没有月流量统计和三网丢包率统计
- 主机状态监控能对主机进行排序,但是服务状态监控却不能对服务进行排序
V1 新版安装
前言
最近无聊,还是把哪吒更新到 V1 吧,发现 23 年写的 V0 漏了一些东西,顺便补充一下
安装
因为我打算用 CDN 且不打算放 8008 端口(我的防火墙只放了 80 和 443 端口),所以先准备好一个域名解析到 VPS 的 IP,设置好 CDN(我用的是 Cloudflare 直接打开小云朵了)
安装面板
1
curl -L https://raw.githubusercontent.com/nezhahq/scripts/refs/heads/main/install.sh -o nezha.sh && chmod +x nezha.sh && sudo ./nezha.sh
如果你的服务器位于中国大陆,可以使用镜像:
1
curl -L https://gitee.com/naibahq/scripts/raw/main/install.sh -o nezha.sh && chmod +x nezha.sh && sudo CN=true ./nezha.sh
我都是 Docker 安装,安装完成后按提示输入以下信息:
请输入站点标题:- 自定义请输入暴露端口:- 随意,我直接默认 8008请指定安装命令中预设的 nezha-agent 连接地址- a.com:443是否希望通过 TLS 连接 Agent?- y请指定后台语言:- 选择语言偏好
哪吒探针 Docker 数据默认是放在
/opt/nezha/dashboard,由于我需要统一管理,所以就需要迁移到固定的地方1
2
3
4
5
6
7
8
9
10
11# 进入目录
cd /opt/nezha/dashboard
# 停止容器
sudo docker compose down
# 迁移
sudo mv /opt/nezha/dashboard <迁移目录>/nezha
# 根据自己的需求修改 compose 配置,比如我要给它加入反代网桥
cd <迁移目录>/nezha && sudo nano docker-compose.yaml参考一下
1
2
3
4
5
6
7
8
9
10
11
12
13services:
dashboard:
image: ghcr.io/nezhahq/nezha
container_name: nezha
networks:
- reverse-network
restart: always
volumes:
- ./data:/dashboard/data
networks:
reverse-network:
external: true退出保存继续操作
1
2
3
4
5# 启动容器
sudo docker compose up -d
# 删除原来产生的垃圾文件夹
sudo rm -rf /opt/nezha将
nezha:8008反代到a.com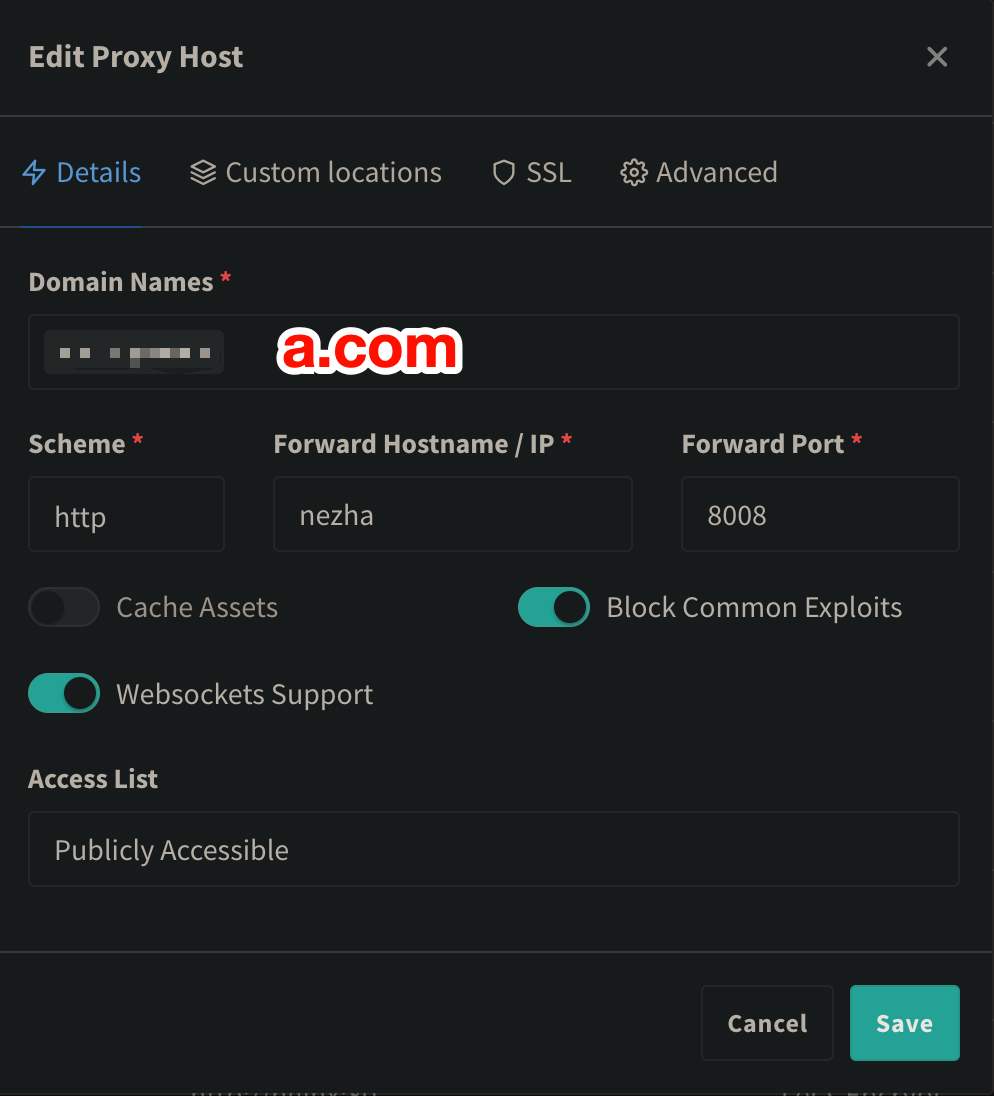
Advcanced 中填入以下内容
1
2
3
4
5
6
7
8
9
10
11
12
13
14
15
16
17
18
19
20
21
22
23
24
25
26
27
28
29
30
31
32
33
34
35
36
37
38
39
40
41
42
43
44
45
46
47
48
49
50
51
52
53
54
55
56
57
58
59
60
61
62
63
64underscores_in_headers on;
set_real_ip_from 103.21.244.0/22; # 替换为你的 CDN 回源 IP 地址段
set_real_ip_from 103.22.200.0/22;
set_real_ip_from 103.31.4.0/22;
set_real_ip_from 104.16.0.0/13;
set_real_ip_from 104.24.0.0/14;
set_real_ip_from 108.162.192.0/18;
set_real_ip_from 131.0.72.0/22;
set_real_ip_from 141.101.64.0/18;
set_real_ip_from 162.158.0.0/15;
set_real_ip_from 172.64.0.0/13;
set_real_ip_from 173.245.48.0/20;
set_real_ip_from 188.114.96.0/20;
set_real_ip_from 190.93.240.0/20;
set_real_ip_from 197.234.240.0/22;
set_real_ip_from 198.41.128.0/17;
set_real_ip_from 2400:cb00::/32;
set_real_ip_from 2606:4700::/32;
set_real_ip_from 2803:f800::/32;
set_real_ip_from 2405:b500::/32;
set_real_ip_from 2405:8100::/32;
set_real_ip_from 2a06:98c0::/29;
set_real_ip_from 2c0f:f248::/32;
real_ip_header CF-Connecting-IP; # 替换为你的 CDN 提供的私有 header,此处为 CloudFlare 默认
# 如果你使用nginx作为最外层,把上面除了第一行都注释掉
# grpc 相关
location ^~ /proto.NezhaService/ {
grpc_set_header Host $host;
grpc_set_header nz-realip $http_cf_connecting_ip; # 替换为你的 CDN 提供的私有 header,此处为 CloudFlare 默认
# grpc_set_header nz-realip $remote_addr; # 如果你使用nginx作为最外层,就把上面一行注释掉,启用此行
grpc_read_timeout 600s;
grpc_send_timeout 600s;
grpc_socket_keepalive on;
client_max_body_size 10m;
grpc_buffer_size 4m;
grpc_pass grpc://nezha:8008;
}
# websocket 相关
location ~* ^/api/v1/ws/(server|terminal|file)(.*)$ {
proxy_set_header Host $host;
proxy_set_header nz-realip $http_cf_connecting_ip; # 替换为你的 CDN 提供的私有 header,此处为 CloudFlare 默认
# proxy_set_header nz-realip $remote_addr; # 如果你使用nginx作为最外层,就把上面一行注释掉,启用此行
proxy_set_header Origin https://$host;
proxy_set_header Upgrade $http_upgrade;
proxy_set_header Connection "upgrade";
proxy_read_timeout 3600s;
proxy_send_timeout 3600s;
proxy_pass http://nezha:8008;
}
# web
location / {
proxy_set_header Host $host;
proxy_set_header nz-realip $http_cf_connecting_ip; # 替换为你的 CDN 提供的私有 header,此处为 CloudFlare 默认
# proxy_set_header nz-realip $remote_addr; # 如果你使用nginx作为最外层,就把上面一行注释掉,启用此行
proxy_read_timeout 3600s;
proxy_send_timeout 3600s;
proxy_buffer_size 128k;
proxy_buffers 4 256k;
proxy_busy_buffers_size 256k;
proxy_max_temp_file_size 0;
# proxy_set_header X-Forwarded-Proto $scheme; # 如果你使用nginx作为最外层,就启用此行避免无法正确读取访问的协议
proxy_pass http://nezha:8008;
}访问
a.com,默认账户密码都是adminWARNING
默认密码为弱密码,对于高权限的面板来说,使用弱密码非常危险!
建议安装后立即进入管理页面:点击头像 → “个人信息” → “更新个人资料”修改密码。
建议密码长度至少 18 位,并混合大小写字母、数字及符号。
V0 旧版安装
注意事项
反代 gRPC 端口并套上 cdn
- 必须先在后台的设置中填入
接入CDN的面板服务器域名/IP /opt/nezha/dashboard/data/config.yaml中要改的,别改错了1
2ProxyGRPCPort: 443 # 不是 GRPCPort
TLS: true
Nginx
直接看 wiki
宝塔
Nginx Config 配置中,upstream 块是可以直接和 Server 块并列的,反代 grpc 也可以直接在 Server 块中填入
Nginx Proxy Manager
在 Advanced 中添加:
1 | underscores_in_headers on; |
ServerStatus 主题去除 icon 和 logo
把网站的元素丢给 gpt,让 gpt 出谋划策得出
1 | <style> |
接入 tg bot
- Telegram 示例 贡献者:@haitau
- 名称:telegram 机器人消息通知
- URL:https://api.telegram.org/botXXXXXX/sendMessage?chat_id=YYYYYY&text=#NEZHA#
- 请求方式: GET
- 请求类型: JSON
- Header: 空
- Body: 空
- URL 参数获取说明:botXXXXXX 中的 XXXXXX 是在 telegram 中关注官方 @Botfather ,输入/newbot ,创建新的机器人(bot)时,会提供的 token(在提示 Use this token to access the HTTP API:后面一行)这里 ‘bot’ 三个字母不可少。创建 bot 后,需要先在 telegram 中与 BOT 进行对话(随便发个消息),然后才可用 API 发送消息。YYYYYY 是 telegram 用户的数字 ID。与机器人@userinfobot 对话可获得。
大陆用户
使用自定义镜像地址
1 | mirror.ghproxy.com/https://github.com |
注意事项
IPv4 地区识别错误的可以尝试把地址识别改成 IPv6
编辑
nezha-agent.service1
sudo nano /etc/systemd/system/nezha-agent.service
找到
ExecStart=...这一行,末尾添加--use-ipv6-countrycode重启相关服务
1
2sudo systemctl daemon-reload
sudo systemctl restart nezha-agent.service
呆梨导致地区变成呆梨地区,把以下几个域名设置成直连即可
1
2
3blog.cloudflare.com
dash.cloudflare.com
cf-ns.com
本博客所有文章除特别声明外,均采用 CC BY-NC-SA 4.0 许可协议。转载请注明来源 七夜 の Blog!
相关推荐

2023-10-03
x-ui 设置二级代理解锁流媒体
问题A VPS 不解锁流媒体 C 但是很稳很快,B VPS 能解锁流媒体 C 但是很拉胯 思路详见上一篇《使用 WARP 解锁 ChatGPT 访问》 xray 配置模版: geosite 域名列表 1234567891011121314151617181920212223//本地监听配置{ "listen": "127.0.0.1", "port": 30000, "protocol": "socks", "sniffing": { "enabled": true, "destOverride": ["http", "tls"] }}//路由规则{ "type": "field", "outboundTag&...

2023-09-16
使用 WARP 解锁 ChatGPT 访问
问题 机房 RackNerd 洛杉矶 dc02 之前一直用网页版的 ChatGPT,今天用了下移动端发现不可用 看来是整个 IP 段都被 OpenAI 拉黑了 思路找一台能解锁 ChatGPT 的 VPS,利用 Xray 的出站规则和路由规则进行前置代理和分流 方案Cloudflare 的 WARP 可以免费用,参考官方教程 12345678910111213141516171819202122232425262728293031323334353637383940414243444546474849Cloudflare WARP packagesCloudflare's client-side software can be installed on Linux with package managers APT or YUM by following these instructions. However, keep in mind that not all packages may support all operating systems or archite...
评论